Introduction
Charming fabric ornaments can bring a special look to your holiday tree. These decorations add warmth and a personal touch that plastic or glass ornaments often lack. Made from different types of fabric, they can fit any style and make your tree unique.
In this article, you will learn why fabric ornaments are a great choice. We will also explore simple ways to create your own or find beautiful ready-made options. You will find ideas and tips to decorate your tree and make the holidays memorable.
The Appeal of Fabric Ornaments
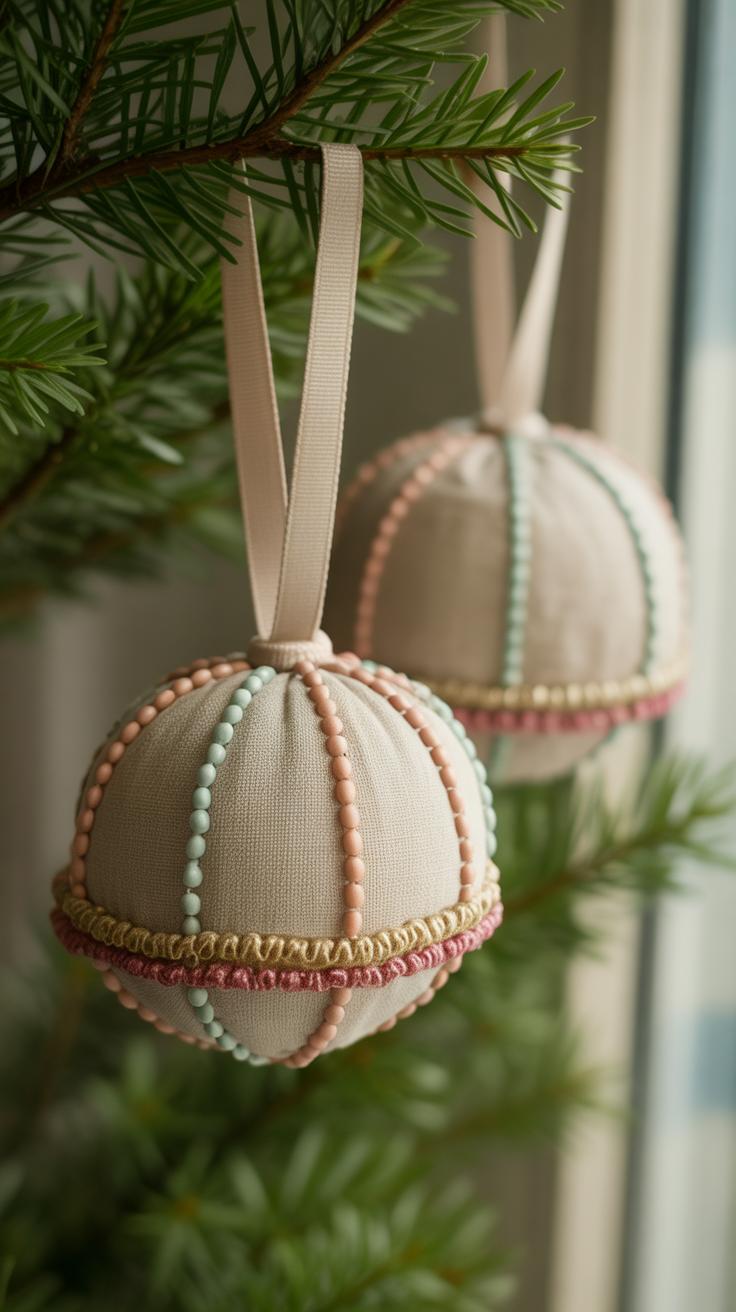
Fabric ornaments stand out from typical tree decorations because of their unique texture and the warmth they bring to your holiday display. Unlike shiny plastic or fragile glass baubles, fabric feels inviting and cozy—something you might almost want to touch. That soft touch adds a quiet charm and can make a tree seem more like home, not just a seasonal display.
There’s also a practical side. If you have kids or pets around, fabric ornaments feel safer. No sharp edges or risk of breaking into tiny, dangerous shards. This softness means you can decorate with less worry about accidents. It’s a subtle difference but one that quickly changes how you live with the tree through the season.
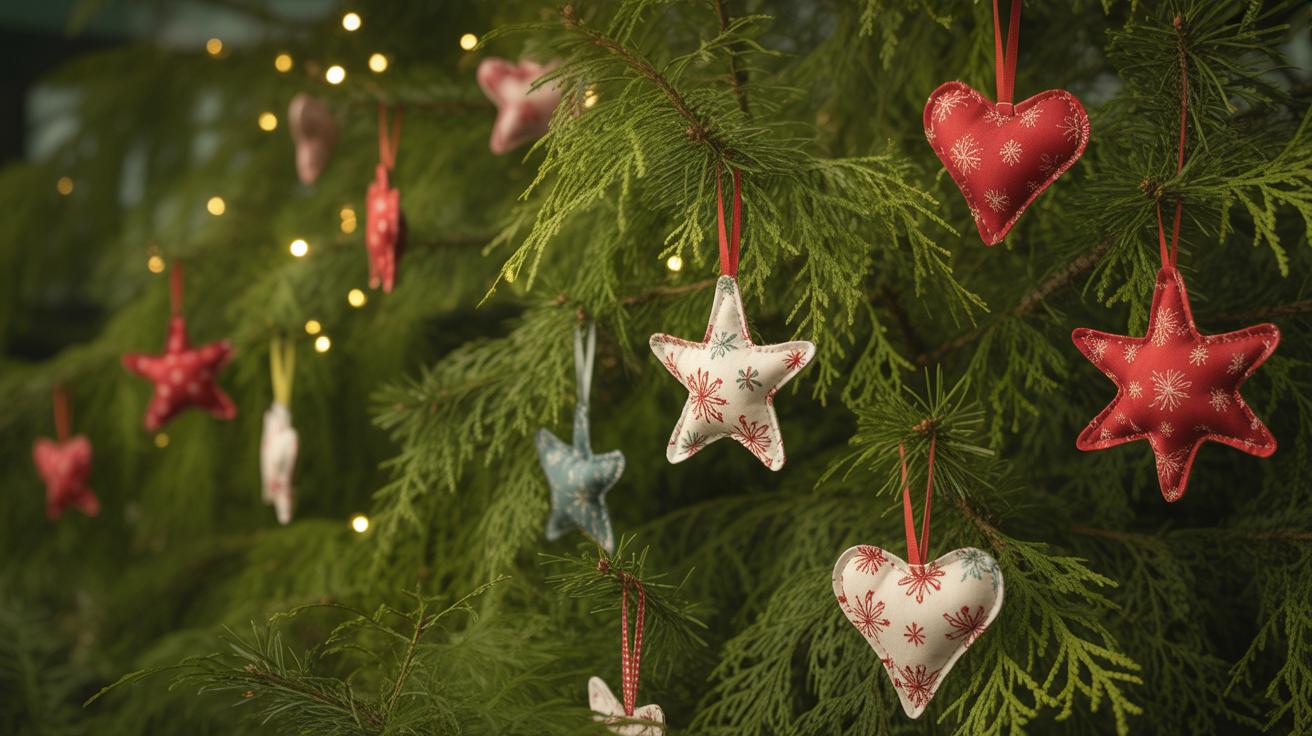
Another appealing aspect is how flexible fabric ornaments are in design. From simple stitched stars to elaborate patchwork shapes, the range is wide. You can mix colors, patterns, and textures effortlessly, which opens doors to personalization you might not find with more rigid materials.
Softness and Safety of Fabric Ornaments
Unlike glass or hard plastic, fabric ornaments are gentle. They don’t break when dropped, which is a relief when a toddler or a curious pet decides to explore the tree a little too closely. This softness isn’t just about not breaking—it creates a safer environment all around.
For people with children, choosing fabric can be a way to avoid panic mid-season. I once saw a glass ornament shatter under the tree, and although it was a small mess, it definitely caused a scare. Fabric ornaments allow you to relax a bit more, knowing the decoration won’t hurt if it falls or gets tugged.
Pets seem to find them inviting too—especially the ones made from felt or cotton, which feel kind of like toys. They’re less likely to provoke accidents or damage, and maybe this makes the whole holiday vibe feel a little less fragile.
Variety in Fabric Designs and Styles
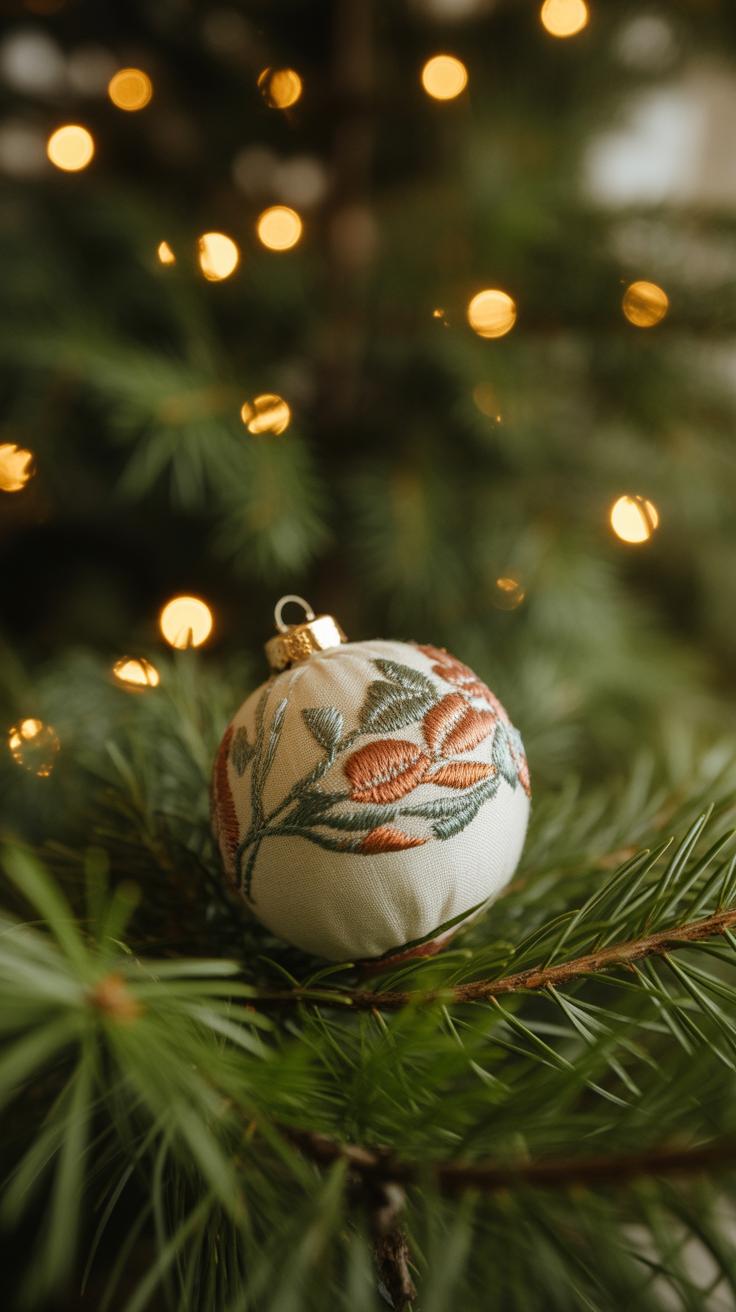
When it comes to decorating with fabric, your options multiply. You’re not stuck with uniform, mass-produced shapes. Fabrics come in endless colors, patterns, and weaves—plaid, polka dots, floral, solids, you name it. Some ornaments combine multiple fabrics, adding layers of interest.
This variety means you can create ornaments that reflect your style—vintage, modern, rustic, whimsical—whatever fits your mood or theme. You might find yourself mixing old quilt scraps with new fabrics, or experimenting with embroidered details.
There’s also room to get creative with shapes. Stars, hearts, animals, tiny stockings—fabric lends itself well to hand-sewing or glueing, making personalization or gifts more meaningful. So perhaps your tree can tell a story, one stitch at a time.
Materials Needed for Making Fabric Ornaments
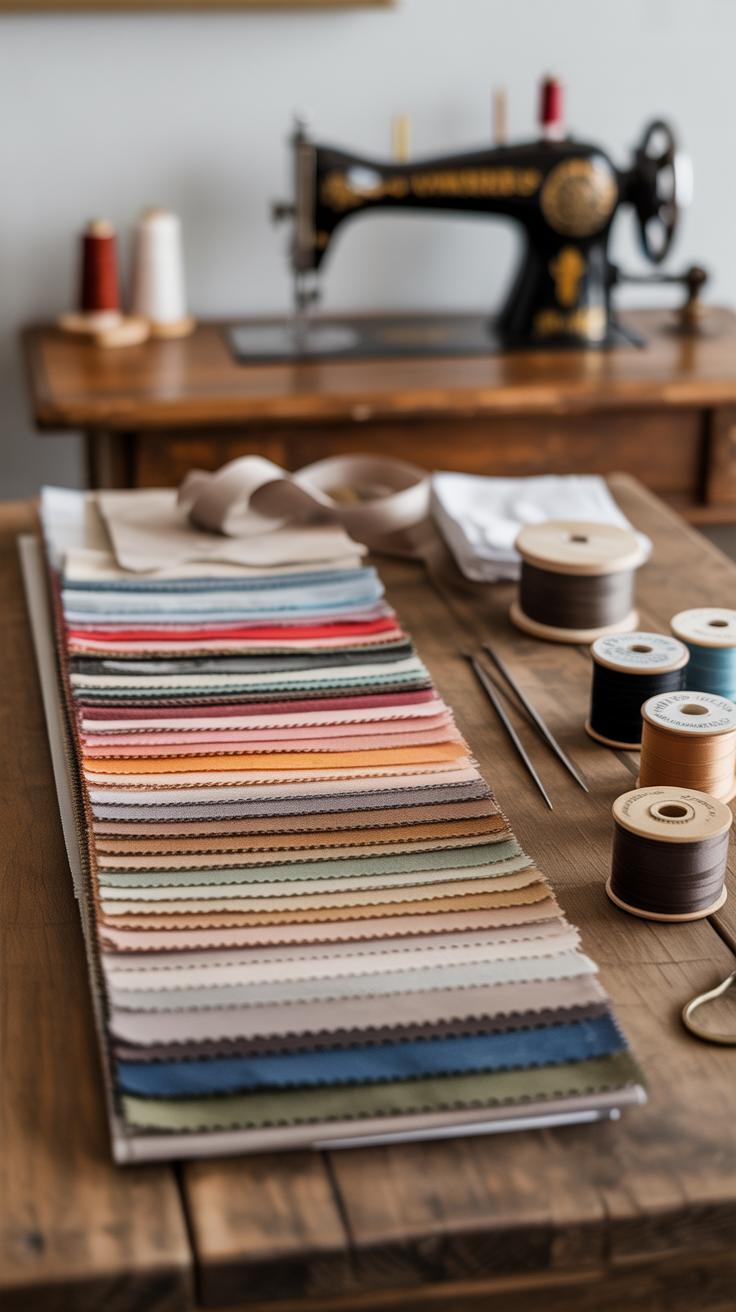
When you start crafting fabric ornaments, the first thing you’ll notice is the variety of materials involved. Cotton is one of the most common choices—it’s easy to sew, washes well, and comes in countless patterns. Felt is another favorite. It doesn’t fray, which means you can skip hemming edges, making it perfect for quick projects or beginners.
Using fabric scraps can be a smart, eco-friendly option too. You might find yourself rummaging through old clothes or leftover project pieces, suddenly inspired by tiny patterns or colors that feel just right. Threads and needles are obvious, but picking thread colors that blend or contrast nicely can actually change the whole look.

And then, there’s the fun part—embellishments. Buttons, ribbons, or little bows add character and sometimes a subtle glimmer. A tiny button on a fabric snowman’s coat, for instance, feels like a story waiting to be told. You can’t beat how these little extras personalize each ornament, making it unique in its own way.
Choosing the Right Fabrics for Durability
Not every fabric holds up the same over time, especially on a tree that’ll be handled, stored, or transported year after year. Thicker fabrics like felt or denim tend to last because they resist tearing and don’t stretch out of shape easily. Cotton can be durable but tends to fray unless you take extra care with finishing edges.
Texture plays a big role, too. Smooth fabrics may look neat, but they’re prone to slipping through your fingers while sewing or hanging. Rougher textures give you grip and dimension—plus they feel more “homey,” which often matches the cozy vibe of fabric ornaments. Colorfastness isn’t always top of mind, but it matters. If a fabric bleeds color (especially reds), it can stain other ornaments or your tree needles.
Pick fabrics that keep their color after washing or over sunlight exposure if your tree catches the light. You don’t want your ornaments looking faded in a couple years. Still, sometimes a little fading adds charm, though that’s a personal call. What matters most might be combining durability with a look you enjoy, even if it’s not perfect.
Extra Materials to Add Charm
Besides the basics, think about adding small beads or lace trims to your ornaments. Beads can make a star glisten or a berry pop off a holly decoration. Lace adds softness and vintage flair, almost like a little whisper from a bygone season. Ribbon is the easiest upgrade—you can change an ordinary ornament into something fancy by simply adding a silky bow or a rustic twine loop.
Buttons often steal the show, not just as functional pieces, but when chosen for color, shape, or even old-fashioned styles. Sometimes a tiny metal bell or a sequin gives a bit of unexpected sparkle, catching the eye in the dim twinkle of holiday lights. These extras don’t just decorate; they invite you to touch, to look closer, to connect with each piece. That’s probably why I always keep a small box of random trims handy while making ornaments—there’s something about a well-placed detail that turns simple fabric into a lasting memory.
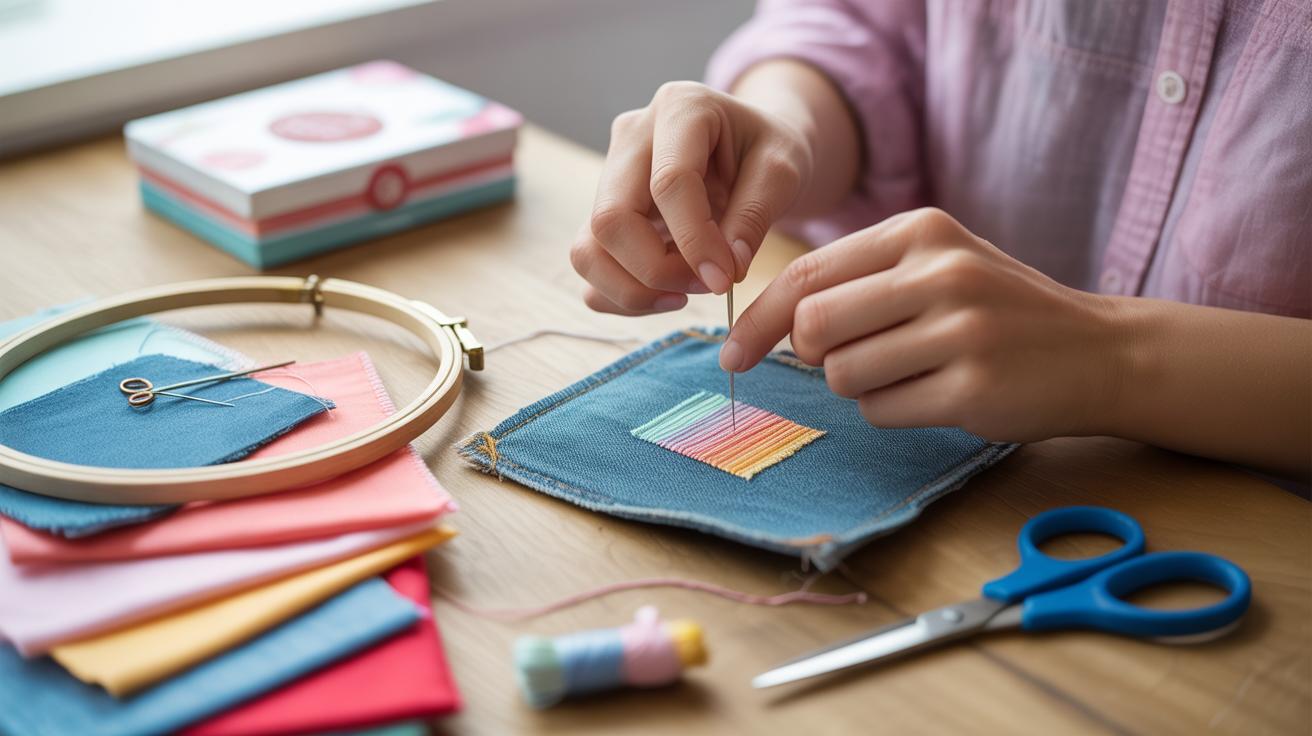
Simple Sewing Techniques for Beginners
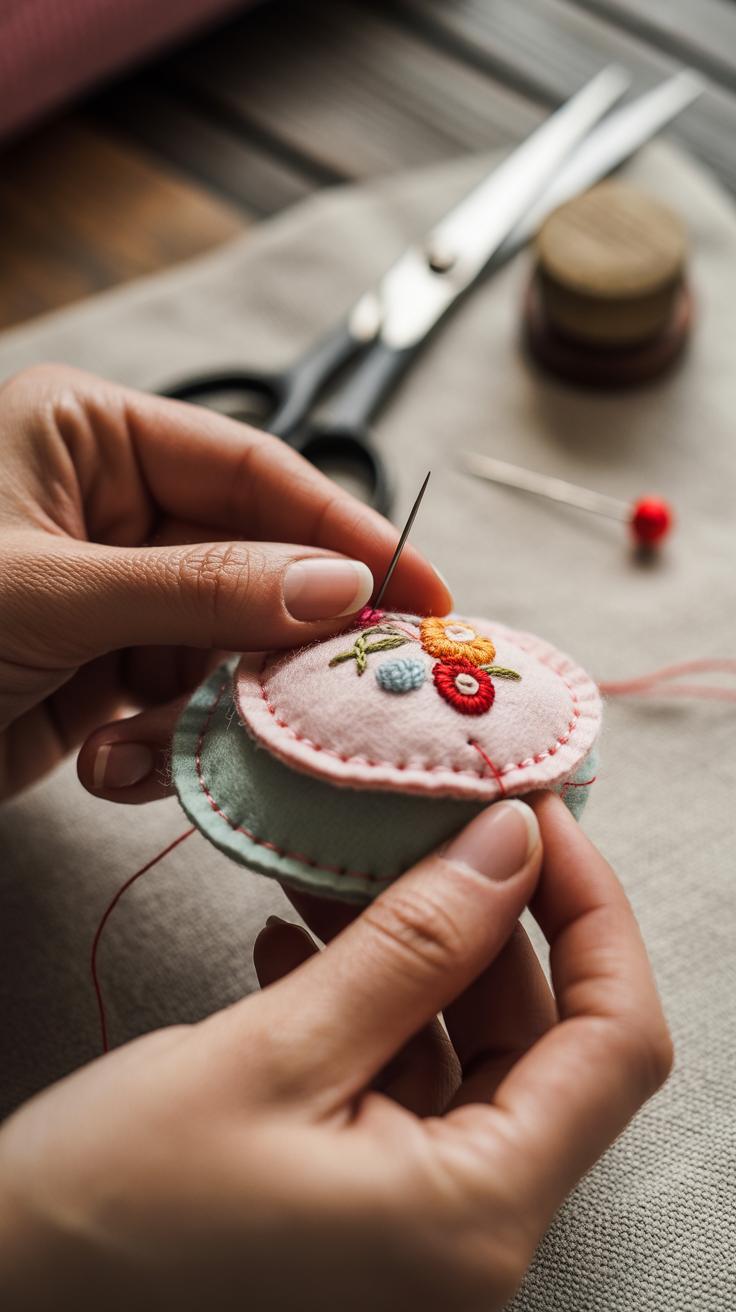
Sewing fabric ornaments doesn’t have to feel overwhelming, even if you’ve never held a needle before. Starting with basic hand sewing techniques can quickly get you comfortable—and honestly, there’s something satisfying about stitching by hand, isn’t there? You don’t need fancy machines or years of experience. Just a needle, some thread, and your chosen fabric scraps can begin turning into charming little decorations.
First, familiarize yourself with a few simple stitches. The running stitch is probably the easiest: just weave your needle in and out through the fabric in small, even steps. It’s great for holding two pieces of fabric together or creating subtle outlines.
Then there’s the blanket stitch. It’s a bit more decorative—you sew loops along the edge of your fabric pieces to keep them neat and add a handcrafted touch. This stitch works well for edges of simple shapes, helping prevent fraying, especially on felt.
The backstitch might seem tricky at a glance but is actually straightforward once you try it. It makes a strong, continuous line and is ideal for seams that need extra durability. I find it useful when sewing small heart shapes or stars, where the seams might get a little tug.
When you’re ready to sew your ornament shapes, pick ones that don’t require too much fiddling. Circles, hearts, and stars are great starters. Cut two pieces of the same shape from your fabric, align them with right sides facing each other, and sew around—leaving a small gap. Turn the shape right side out through that gap, lightly stuff it if you like, and then stitch the opening closed.
For example, a simple fabric star only needs five straight lines stitched around the edges. Don’t worry about perfection—slight unevenness adds character. Hearts and circles follow much the same method. You’ll get better with each one.
Have you tried sewing something by hand before? What did you notice about your stitches? Don’t stress over tiny mistakes—they’re part of the process and give your ornaments that personal charm you won’t find in store-bought ones.
Creative Ideas for Fabric Ornament Designs

When thinking about fabric ornaments, you might start picturing simple shapes stitched together, but there’s so much room to play here. Classic shapes, for instance, have a familiar charm that’s hard to beat. You could cut out little Christmas trees from green felt, stuff them lightly, and add a sprinkle of glitter or tiny beads as ornaments. Candy canes work well too; just sew two fabric strips into a curved cane shape, alternating red and white patterns to keep it looking festive. Snowflakes are a bit trickier but worth it—layer different lace or embroidered fabrics for that delicate effect.
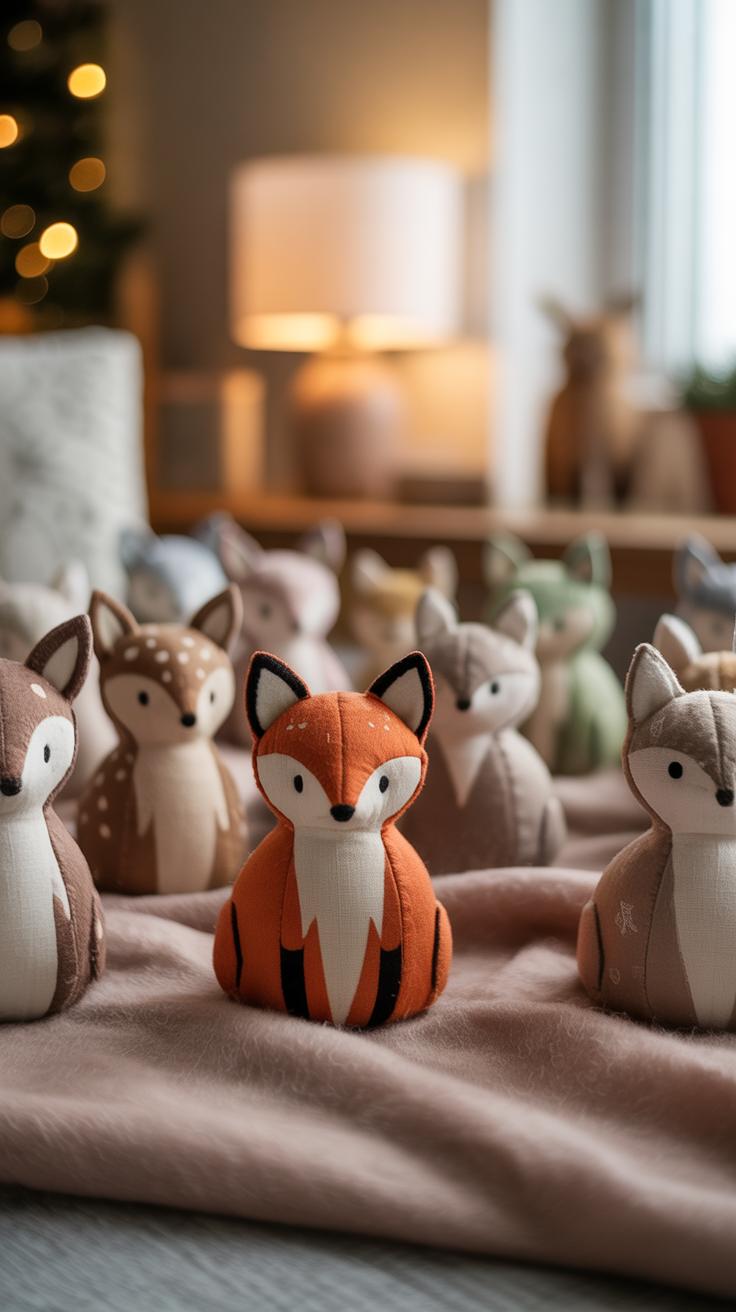
On the flip side, you might want to try something less predictable—like quirky animals or layered flowers. I once made fabric foxes with tiny button eyes and little embroidered noses. They ended up being a fun talking point during holiday gatherings. Stars with buttons sewn onto various fabric textures can brighten up your tree in a playful way. Or consider stacking petals cut from different patterned fabrics to create dimensional flowers. Each layer can be a new texture or color, which really keeps the ornament from looking flat.
What about themed sets? Maybe a little flock of birds or a trio of mitten shapes in plaid and solids. Mixing traditional and quirky shapes can give your tree a lively, personal feel. Plus, fabric works so well with layering—you can add trims, ribbons, or even small charms to your designs if you’re feeling adventurous. It’s less about perfection and more about the story each piece tells, don’t you think?
Using Leftover Fabric to Reduce Waste
You might already have a pile of fabric scraps lying around, and I think those little pieces deserve more attention than just being tossed out. Small remnants from past projects can actually become charming ornaments for your tree. It’s a quiet way to cut down on waste and add a personal, eco-friendly touch to your holiday décor.
Try cutting your scraps into simple shapes—stars, hearts, circles—then stitch or glue them together. Even the tiniest strips can make loops or tassels. What’s great is that nothing has to be perfectly cut; uneven edges give the ornaments character. If you worry about using all those odd shapes, consider stuffing small pieces with cotton or scraps of batting to give them some volume.
Smart Ways to Cut and Use Scraps
When you face that pile of leftovers, it’s tempting to just chop randomly. But some thought here can save you more scraps later on. Here’s what I’ve learned works:
- Organize your scraps by size and color before starting—makes picking pieces easier.
- Use cookie cutters or stencils to trace shapes, minimizing waste as you can nest shapes tightly together.
- Keep a small rotary cutter handy for precision cuts; it’s easier and faster than scissors.
- Trim uneven edges off larger scraps and save those trims for tiny bead wraps or ornament loops.
These simple habits make your fabric work feel less chaotic—and more satisfying. I sometimes find myself caught up in trying to use every scrap, which slows me down a bit, but it pays off.
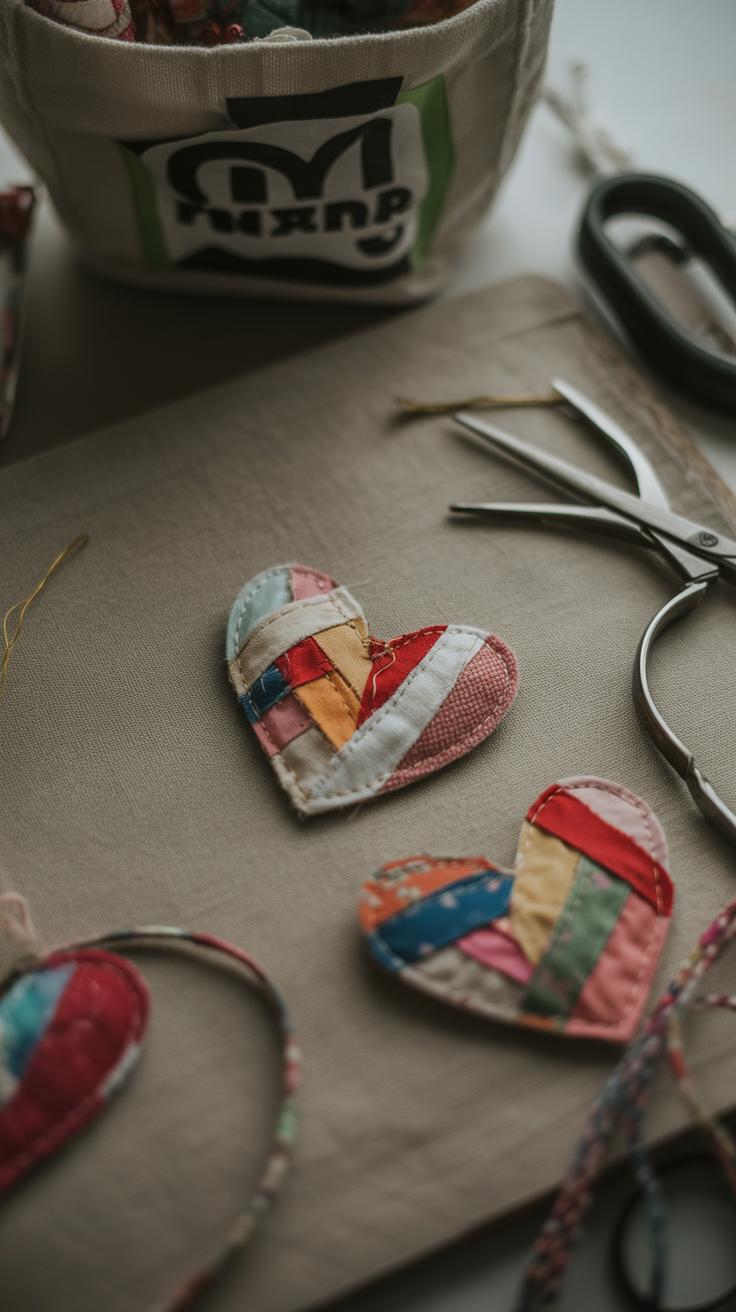
Combining Different Fabrics Creatively
Mixing scraps of different textures and colors can lead to surprisingly vibrant ornaments. Don’t be shy to pair something smooth with something coarser or combine patterns that, on their own, seem odd.
Here are a few ways you can approach patchwork ornaments:
- Create small quilts or patchwork balls by sewing several small pieces together, which can make for a rustic look.
- Layer contrasting fabrics—like cotton and velvet—to add depth and interest to flat shapes.
- Use scraps to form stripes, chevrons, or random patchwork squares on one ornament for a playful feel.
- Apply raw edges intentionally for a slightly frayed, soft aesthetic that matches well with natural holiday themes.
Sometimes, I find that trying to predict how fabrics will blend can be tricky, but that uncertainty often leads to the most memorable ornaments. Maybe that’s part of the charm.
NonSewing Options for Fabric Ornaments
Sometimes, you just want to skip the needle and thread. Not everyone feels confident sewing, and if you’re crafting with kids, sewing can get tricky. Using fabric glue or fusible tape opens up easy, no-sew methods to create charming ornaments quickly.
Fabric glue works best when you need a strong hold without fuss. Just apply a thin line on the edges of your fabric pieces, press them together, and wait. It’s basically like crafting with paper, but softer. Fusible tape, meanwhile, bonds fabrics when heated by an iron—great if you have kids around but want a cleaner finish without the mess of glue.
Felt and pre-cut fabric shapes can speed things up even more. Felt doesn’t fray, so no edge finishing is necessary. You can quickly layer or stack shapes—stars, circles, trees—and glue them freehand or follow simple templates. These pre-cut forms help avoid cutting frustration, especially with little hands involved.
- Use fabric glue to join pieces edge to edge or layer shapes.
- Fusible tape offers a neat join with a quick press of an iron—no drying time.
- Pick felt or pre-cut fabrics for easy assembly and less mess.
- Simple embellishments like buttons or ribbon loops can be glued on easily.
- Kids enjoy pressing pieces together and seeing the ornament take shape immediately.
It might feel a bit less traditional, but no-sew methods can produce surprisingly sturdy, attractive ornaments. If you’re short on time or sewing skills, these approaches? Worth trying, for sure.
Where to Find and Buy Fabric Ornaments

If you’re looking to add fabric ornaments to your holiday tree without making them yourself, there are plenty of places to check out. Craft stores are a solid start—they often carry seasonal selections, especially as the holidays approach. You might find everything from simple felt shapes to more intricate quilted designs. Sometimes, though, the quality there can feel mass-produced, so keep an eye out for details like sturdy stitching or well-chosen materials.
Online shops offer a huge variety, ranging from big platforms like Etsy to boutique websites specializing in handmade holiday decor. Browsing online lets you compare styles and prices easily, but it can be tricky to judge texture or size through pictures alone. I’ve found that reviews help a lot, particularly when buyers mention the sturdiness or how the fabric holds up over time.
Local artisan markets and craft fairs are my favorite spots. These places tend to have one-of-a-kind ornaments you won’t see anywhere else. Plus, buying from local crafters means you’re supporting small businesses, which feels good. Often, artisans are happy to chat about their work and maybe even customize something just for you. These ornaments carry a certain charm you won’t get from big stores.
When shopping, look for:
- Natural fabrics like cotton or wool, which tend to last longer
- Clear, secure stitching or neat glue work if it’s no-sew
- Ornaments that feel substantial rather than flimsy or overly thin
So, where do you think you’d start? A local craft fair might surprise you, or maybe an online shop with thousands of options will spark your curiosity more. Either way, fabric ornaments can add warmth and personality to your tree—sometimes much more than standard glass baubles.
Caring for Your Fabric Ornaments Over Time
Cleaning Tips for Fabric Decorations
Fabric ornaments invite a certain softness to your holiday decor, but cleaning them can be tricky. You don’t want to risk colors bleeding or delicate stitching coming undone. Usually, spot cleaning works best—use a mild detergent diluted in water and gently dab the stained area with a soft cloth. Avoid rubbing too hard; it can damage the fibers or fuzz them up. Sometimes a little patience is necessary, letting the solution sit briefly before blotting it away.
For ornaments with stubborn dirt, a light brush with a soft toothbrush might help. But beware of ornaments with glued-on parts or glitter—they don’t react well to moisture. In those cases, a quick dusting with a dry brush or gentle shake might be all they get. I once tried washing a heavily stained fabric angel and ended up with a shapeless mess, so maybe I’d suggest being cautious with water.
Best Storage Practices to Keep Ornaments Safe
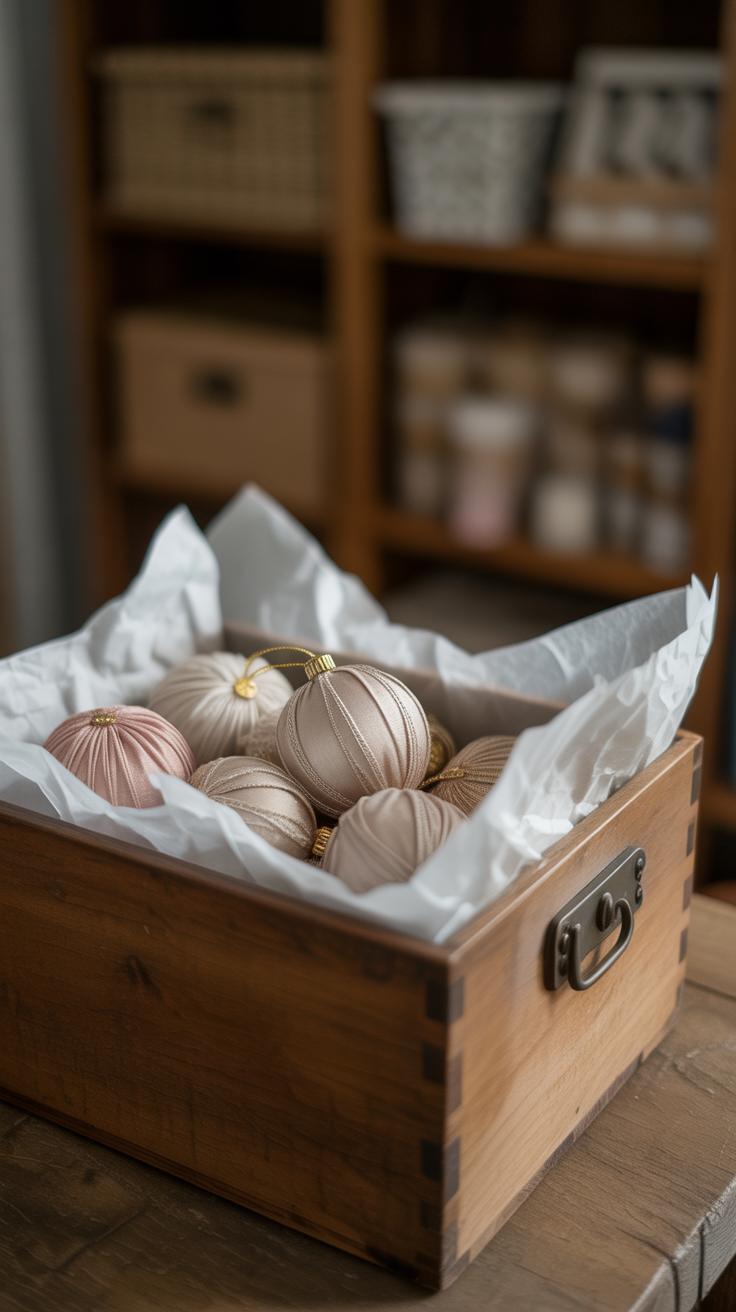
After the holidays, storing your fabric ornaments properly pays off. Wrapping each piece in acid-free tissue paper prevents color transfer and keeps them from snagging on other decorations. You can neatly arrange them in sturdy boxes, preferably the ones designed for ornaments, which have compartments to avoid crushing.
If boxes aren’t an option, try hanging the ornaments in a cool, dry closet to keep them accessible and off surfaces where bugs or moisture could cause trouble. Some folks store ornaments in small cloth bags, though those can sometimes attract moths if left too long—so, maybe keep an eye on those.
Temperature and humidity matter, too. A damp basement or attic might cause mold or mildew, and extreme heat can fade fabrics over time. Finding a spot that’s consistent in climate can be surprisingly important. After all, these ornaments carry memories, and keeping them looking good year after year feels worth the effort, doesn’t it?
Conclusions
Fabric ornaments offer a creative and cozy way to decorate your tree. Their softness and diversity make them stand out. You can use scraps, sew simple shapes, or buy lovely pieces that suit your style. They are safe for kids and pets, which adds peace of mind during the festive season.
Using fabric ornaments shows your personal style and makes decorating fun and meaningful. Try making some yourself or mix homemade and store-bought ones. Your tree will look charming and invite warm holiday feelings into your home year after year.