
Introduction
Converting a school bus into a cozy bus living space is a creative way to embrace a lifestyle that is both mobile and affordable. Many people are choosing this route to have the freedom to travel and live in a small but comfortable home. This guide explores how you can make this transformation step by step.
You will learn about the planning, design, and practical steps needed to convert a school bus into your personal living space. From choosing the right bus to installing key features, the article covers everything you need to get started on your bus living journey.
Understanding Bus Living
Bus living means making a home out of a converted vehicle, often a school bus. This lifestyle choice isn’t just about having a roof over your head; it’s about mobility, freedom, and a way to live differently. People who take on bus living usually seek a change from the conventional housing path. Living in a bus challenges the norms of what “home” is. Instead of being tied to one address, you can move your entire living space as you please, which can be both exciting and unsettling.
Some choose it for environmental reasons or a simpler way of life, while others want to downsize drastically. You might find that the appeal is a mix of several factors: the idea of having a tiny home on wheels, cutting monthly expenses, or pursuing a nomadic lifestyle. What’s curious is how personal it can feel. Your bus becomes more than just a place to live—it becomes part of your identity, in a way.

Still, it’s not for everyone. The benefits often come with trade-offs, and the lifestyle demands flexibility and patience you might not have expected. Yet for many, the reward lies in taking control of where and how you live, leaving behind more traditional and fixed ways of dwelling.
Why Choose Bus Living
Mobility tops the list. Imagine waking up in a forest one day, a beach the next. The bus becomes your vehicle to explore without packing and unpacking. This freedom attracts travelers, remote workers, and even retirees who want to keep moving while staying connected to their routines.
Cost savings play a big role, too. Traditional housing costs—rent, mortgage, utilities—can be overwhelming. Living in a bus cuts a lot of that out. While there are upfront costs to convert a bus, long-term expenses tend to be lower. It forces a simplified lifestyle, which some find refreshing and even necessary for mental clarity.
People often mention that downsizing to bus living helps reduce clutter and forces them to focus on what truly matters. It’s not about packing up all your belongings, but distilling life into essentials. It’s kind of like hitting a reset button on consumption habits and daily routines.
Bus Living Challenges
Space is tight, no doubt. Even the largest buses feel tiny when converted. Living here means rethinking your belongings, habits, and sometimes your definition of comfort. It’s easy to underestimate how much space you actually need until you try it yourself.

Maintenance is another layer you can’t ignore. A bus is a vehicle first, so you deal with engine troubles, tires, and unexpected repairs alongside the usual home upkeep. It’s a mix of homeowner and driver responsibilities—sometimes both at once, which can get tricky.
Legal considerations add yet another complication. Where can you park overnight? How do you handle residency requirements or insurance? These questions often come up, and answers depend a lot on local regulations, which can be confusing and inconsistent. Many get caught off guard by these practical hurdles.
Bus living is not just a unique choice—it invites ongoing adjustments and compromises. It’s not always clear-cut if the benefits outweigh the difficulties, but it’s a lifestyle that requires curiosity and resilience. If you’re prepared for that, the rewards might just be worth it.
Choosing The Right School Bus

Picking the right school bus to convert is more complicated than just grabbing the first one you see. There are different sizes and types, each with quirks that can either help or hinder your conversion project. You might find yourself torn between wanting more space and the difficulties of driving a larger vehicle. So, understanding what’s out there helps.
Bus Sizes And Types
School buses generally come in three main sizes: small, mid-sized, and full-sized. Small buses—like those designed for special needs transport—are easier to drive and park but offer less living space. Full-sized buses, often 35 to 40 feet long, provide lots of room but can feel bulky and demanding to maneuver. Mid-sized ones fall somewhere in between and might strike a balance if you want space without too much hassle.
There are also Type A, C, and D buses. Type A are smaller vans, often the least spacious, while Type C are the traditional “conventional” school buses you likely picture. Type D are the big, flat-front buses with the engine under the floor—these can offer more usable interior space but might be more complex mechanically. I’ve seen many go for Type C simply because they’re easier to find and maintain.
Finding A Bus To Buy
Where to find these buses is another puzzle. School districts often sell retired buses through online auctions or local government sales. Websites like GovDeals or PublicSurplus list buses frequently, but you need to be ready for quick decisions and possibly inspections before bidding. Sometimes, Craigslist or Facebook Marketplace have options, usually from private sellers or small bus companies.
Visiting a bus yard or dealer can give you a chance to inspect the bus firsthand. It’s tempting to buy based just on price, but getting a look at rust spots, engine condition, and the frame saves headaches later. Remember, the easiest bus to convert isn’t always the cheapest one on the lot.
Planning Your Layout
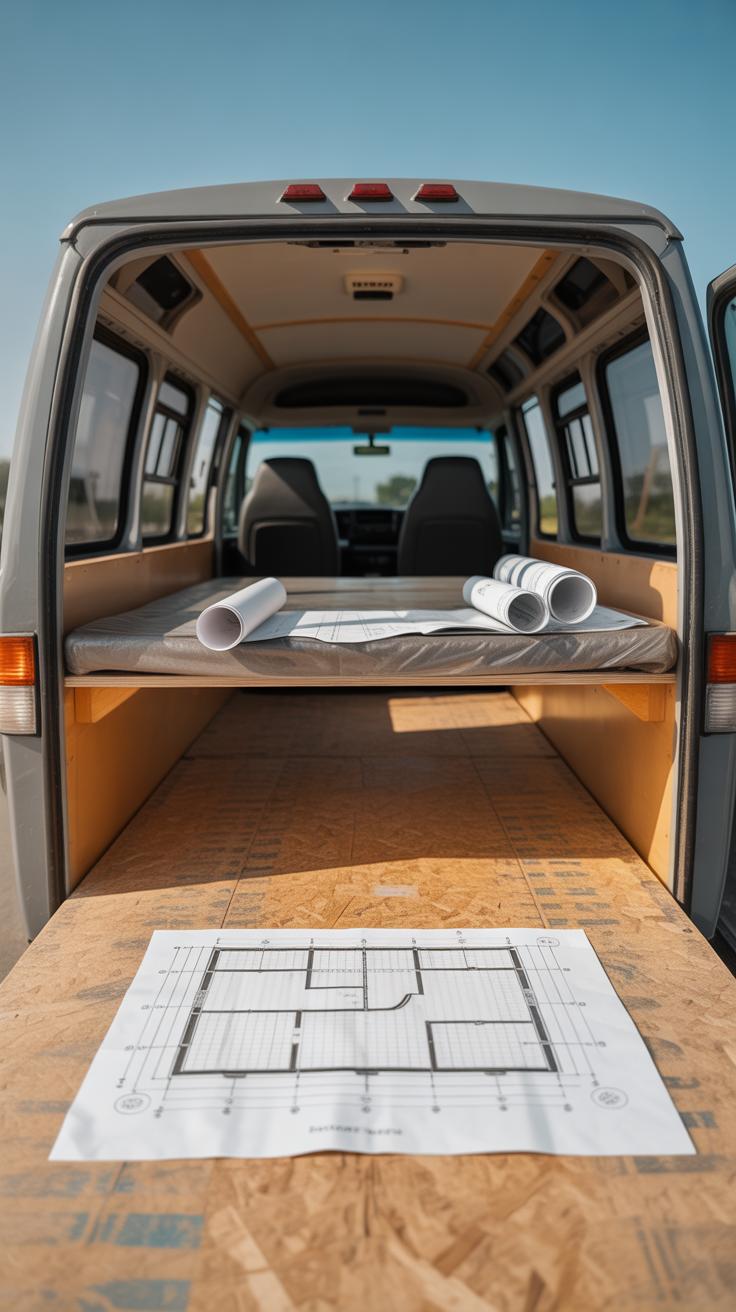

When you’re figuring out the layout of your bus, you’re essentially juggling a few competing needs. You want a place to sleep, cook, and relax—but there’s only so much space to go around. The challenge? Making these zones feel separate enough to function well but connected enough to keep things open.
Start by sketching a rough floor plan. Think about where the windows fall and how light moves through the space during the day. A sleeping area near a window seems obvious, but what if you prefer more privacy or less draft? And the kitchen can’t be a trip hazard, so keeping it near the entry or toward the center often works well.
Here are a few pointers you might find handy:
- Designate clear zones but avoid hard separations—curtains or half walls can create division without shrinking the space.
- Consider placing the bed at the back; it’s out of the way and quieter.
- Put the cooking area close to the entry for ventilation ease, but remember you’ll still need counter space near it for meal prep.
- Leave enough room for a small seating area that doubles as a workspace or dining spot.
The layout doesn’t have to be perfect on the first try. Many who’ve done this rearranged furniture a few times—sometimes moving a couch out of sheer frustration until it felt right. Planning is part art, part trial and error.
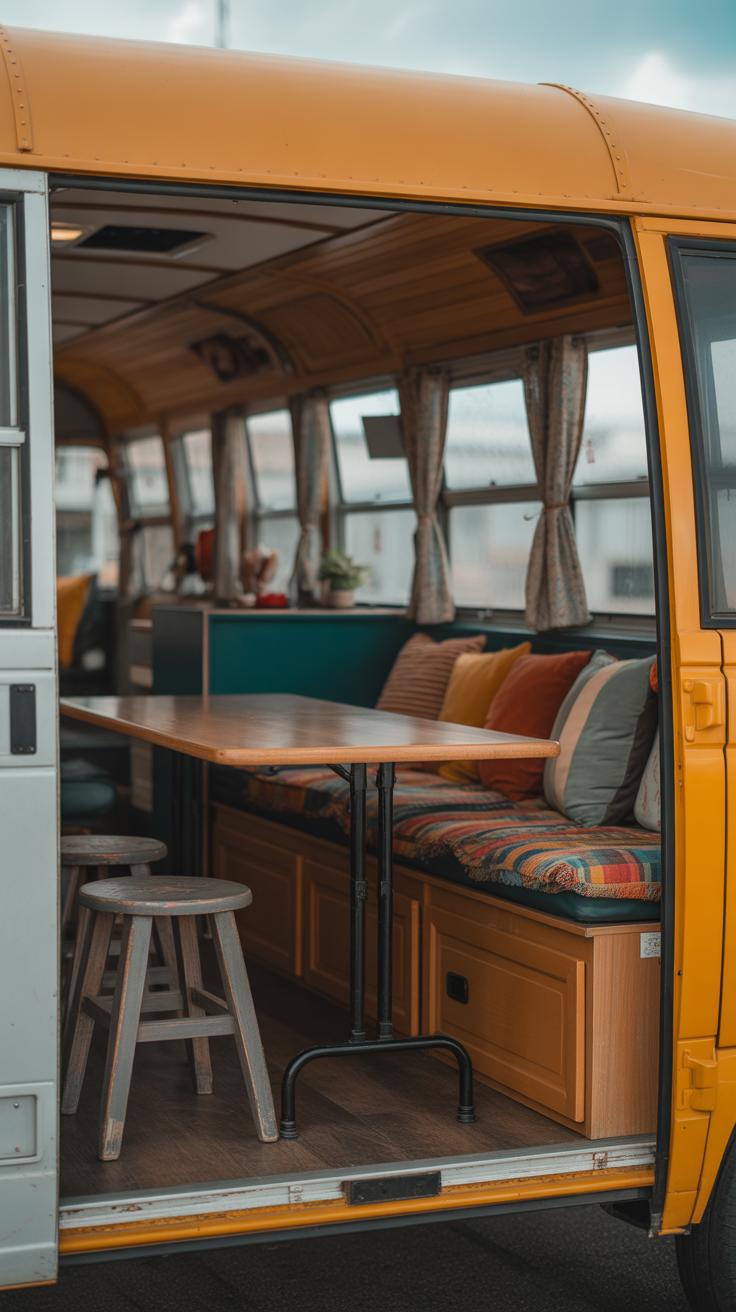
Designing Functional Spaces
Limited square footage means each area must work harder. You want to live comfortably, not feel like you’re stuck in a box. Think about how you use each space daily. Can your living area double as a guest room? Could the kitchen counters fold down when you don’t cook?

It’s often the little adjustments that help. For example, a foldable wall table for dining can be set aside during the day to open up room. Your bed can include underneath storage or even slide away if you want a larger social spot. Multi-use spaces keep the home feeling flexible. Don’t overlook vertical space—shelves high up for less-used items can free up floor area.
I’ve seen some bus conversions where people install seating that flips into a bed. You might think that sounds complicated, but it really adds a level of comfort without crowding you. It’s about balancing simplicity with space-saving innovation—maybe starting with the basics and then adjusting as you live inside.
Optimizing Space Use
Storage can be your best friend or your worst enemy on a bus. You don’t want clutter piled everywhere, but you also can’t throw things out every week. Some people underestimate how much stuff they need day to day—but probably you know what you really use.
Practical tips include:
- Use built-in drawers under benches and beds to make hidden storage.
- Install hooks, racks, and magnetic strips on walls for utensils, tools, or bags.
- Think about multi-purpose furniture—like an ottoman that stores blankets inside.
- Overhead cabinets can work if they don’t make the space feel cramped.
Sometimes, keeping things minimal helps you prioritize what truly matters. You might feel a bit uneasy trying to live with less, but after a while, it gets easier. Space-saving isn’t just about fitting stuff in; it’s about deciding what deserves a spot.
What kind of creative storage or furniture designs do you imagine would fit your lifestyle? There’s a lot to play with, and sometimes stepping back to rethink is the key.
Insulating And Ventilating Your Bus
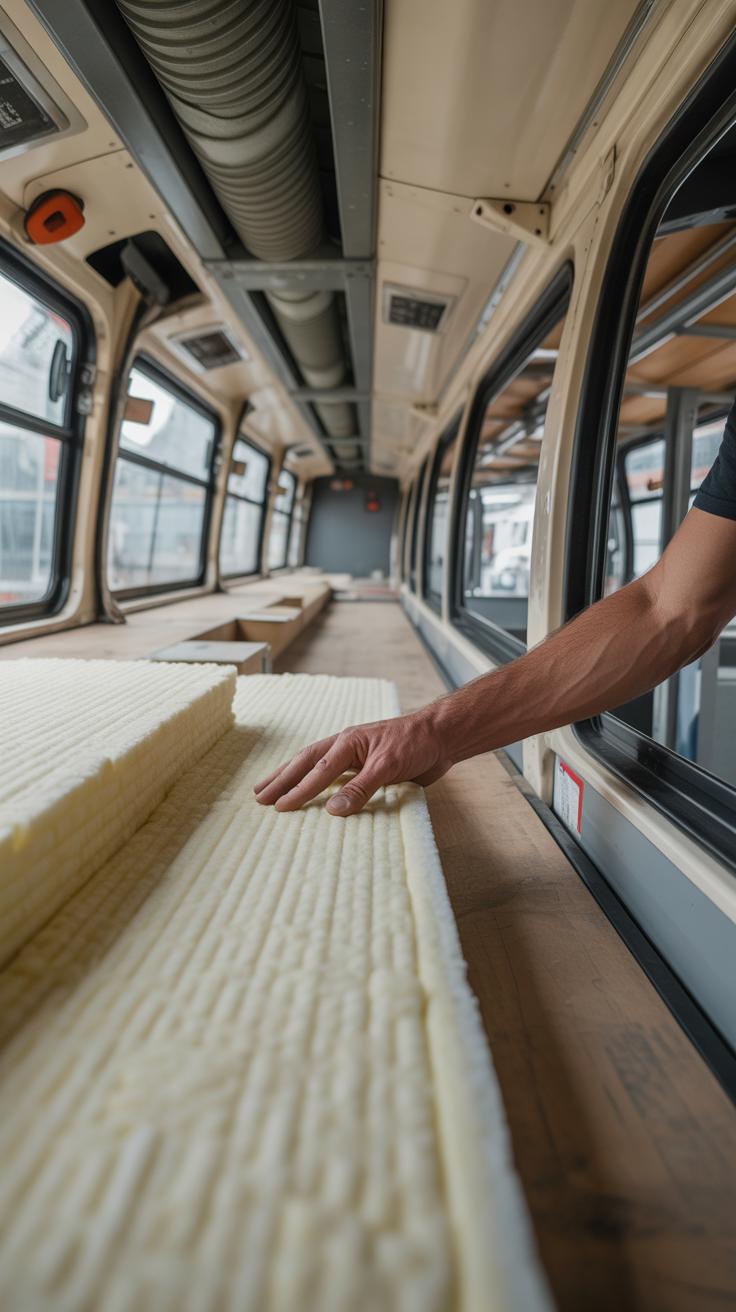
When converting a bus into a living space, insulation and ventilation work hand in hand to keep things comfortable. Without proper insulation, your bus will feel like a greenhouse in summer and a freezer in winter. But seal it up too tightly without ventilation, and you risk stuffy air and moisture buildup.
There are a few insulation materials people often use on buses. Spray foam, for instance, creates a solid airtight barrier and seals gaps well. But it can be expensive, and if you’re not careful it might trap moisture. Then there’s rigid foam board, which is easy to cut and install in flat areas, but doesn’t fill strange-shaped spots as neatly. Reflective foil insulation helps with radiant heat but doesn’t do much for sound or cold. Fiberglass batts are cheap but can sag or trap moisture if left exposed.
Ventilation options range from simple to more involved. Roof vents with fans are common—they let hot air escape and encourage airflow. Opening windows can help, but only if you park in areas safe enough to do so. Some people install small vents low on the sides for cross-breezes, though that might bring in dust or bugs. A well-placed exhaust fan can also help pull stale air out.
Striking the right balance isn’t easy. Do you go heavy on insulation and rely on fans to ventilate? Or keep things a bit looser to allow natural air exchange? Personally, I’ve found combining airtight insulation with powered vents gives the most control, especially in quickly changing weather. What’s your take? Might be worth experimenting before you settle on one approach.
Setting Up Utilities
Getting your bus ready to live in means sorting out the basics: electricity, water, heating, and cooking. These aren’t glamorous topics but hugely necessary. You can’t just hope for the best; there’s some groundwork to cover.
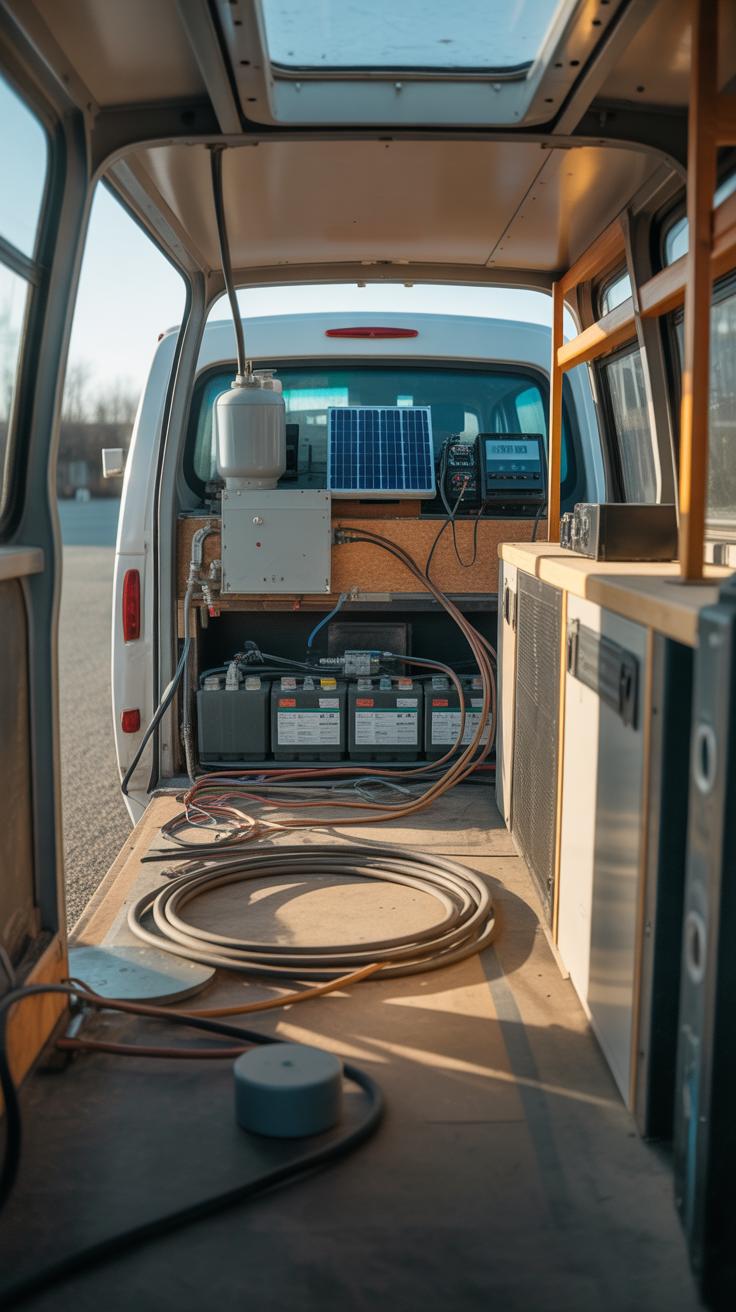
Electrical System Basics
The core of any bus electrical setup usually starts with a deep cycle battery bank. These batteries store power you can draw from throughout the day. Many choose solar panels as the main source—panels mounted on the roof feed energy into a charge controller, which protects your batteries from overcharging. It might seem a bit technical at first, but wiring a simple 12-volt system for lights, USB chargers, and small appliances can be manageable.
Inverters come next if you want to run household plugs off the batteries, but that draws power quickly. It’s always a balancing act: how much electricity you need versus what your solar setup can realistically provide. Sometimes you might wonder if a generator is worth adding for backup, especially in grey or cloudy weather.
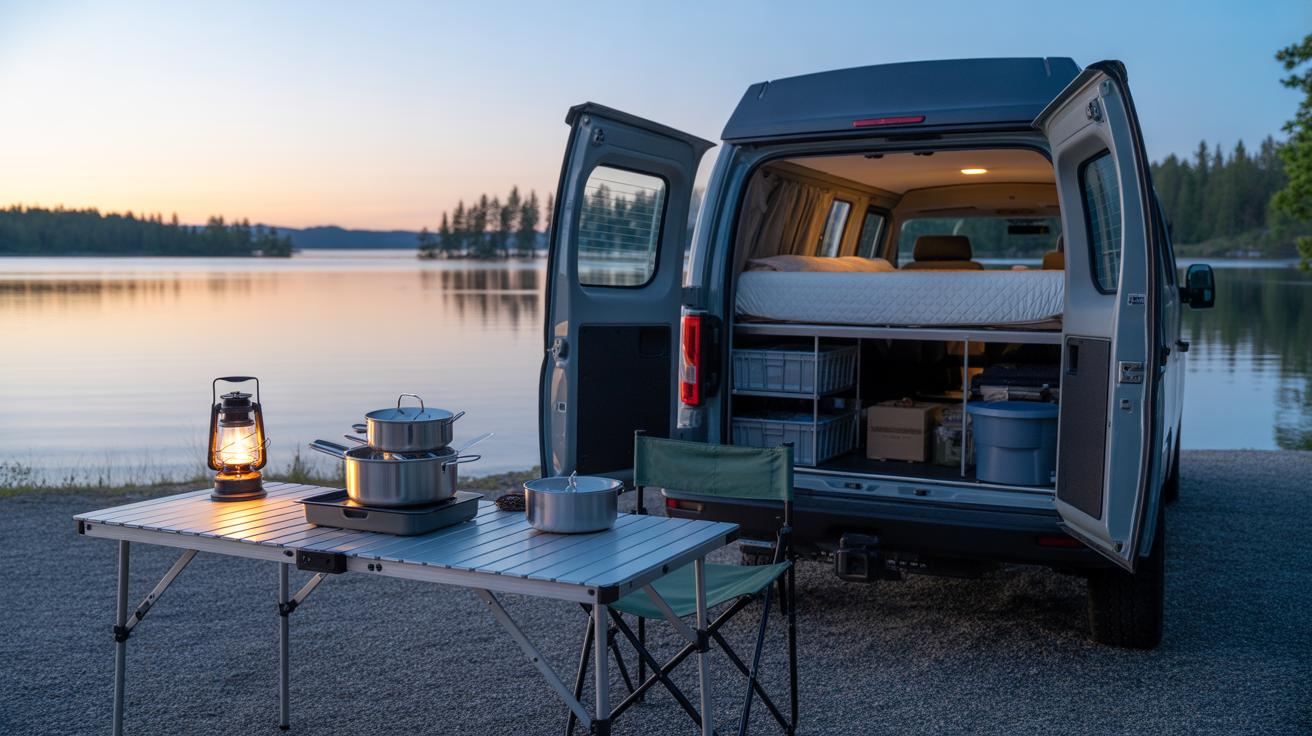
Water And Waste Management
For water, fresh supply tanks usually sit under seats or under the bus itself. You’ll want a hand pump or a small electric pump to bring water from the tank to your sink or shower. It’s simple but effective. Filtered water is ideal, especially if you plan on using it for drinking.
Waste is trickier. Holding tanks collect greywater and blackwater separately—the former from sinks and showers, the latter from toilets. These tanks need regular emptying at dump stations or septic hookups. Deciding between a composting toilet or a small cassette toilet depends on your needs and how often you’re willing to empty them. It gets a bit messy, sure, but with a routine, it becomes manageable.
Do you want the freedom of dry camping far from facilities, or is staying close to services easier? Your choices here affect how you set everything up. Either way, the key is planning for space, easy maintenance, and quick access.
Building Furniture And Fixtures

When it comes to creating furniture for a bus living space, space is your most precious commodity. You need pieces that fit well but don’t crowd your movement. Sleeping platforms often double as storage or seating, so think about multi-functionality from the start. A raised bed with drawers or bins underneath can work wonders. You’ll find that building a simple frame with plywood sheets and sturdy supports is surprisingly doable with basic tools.
Seating can be tricky. Fixed benches with cushions can double as storage, but removable or fold-down seats give you more flexibility. Consider modular designs; pop-out sections or collapsible elements can let you switch between lounging and open floor space. Something I learned early on is that comfort matters almost as much as space-saving — hard seats quickly become a daily annoyance.
Storage should be tucked into every nook you can find. Overhead cabinets above windows, under-bench cubbies, and slim vertical shelves along walls can all help. Remember, too much closed storage might make the space feel cramped, so mix in some open shelves to keep the bus feeling airy. Finding the balance between storing essentials and keeping clutter out of sight is a constant push and pull.
Custom Furniture Ideas
Practical designs mean furniture that adapts to your lifestyle. Fold-out tables that double as desks or dining surfaces are handy, especially if you need work space. A bench that converts into a guest bed, or nesting tables you can stack or separate, make living flexible. Even lightweight hammocks or sling chairs can add comfort without permanent installation.
Thinking vertically often helps. Use walls beyond eye level for hooks, baskets, or magnetic strips for tools and kitchen utensils. Also, try sliding panels or hidden compartments—you might surprise yourself with what can fit. When I built a small fold-down desk on my bus, I didn’t expect to use it every day, but it quickly became a favorite spot for reading and relaxing.
Choosing Materials
Materials are a balancing act between durability and weight. You want strong enough wood like plywood or light hardwoods to handle daily use but not so heavy it slows you down or reduces gas mileage. Bamboo boards, for instance, offer a good mix of strength and lightness, plus they look clean and modern.
Metal frames can add sturdiness—think steel or aluminum—but they also add weight and sometimes coldness, so pairing metals with softer woods or cushions makes sense. For surfaces, laminate or coated plywood resist moisture and wear better than plain wood, which can swell or stain easily.
Sometimes I was tempted to go for the cheapest option, but that usually means replacing or fixing things far too soon. A bit more upfront effort choosing materials pays off when your furniture lasts through the bumps and turns of bus life. Plus, lighter materials help keep your build nimble and easier to handle.
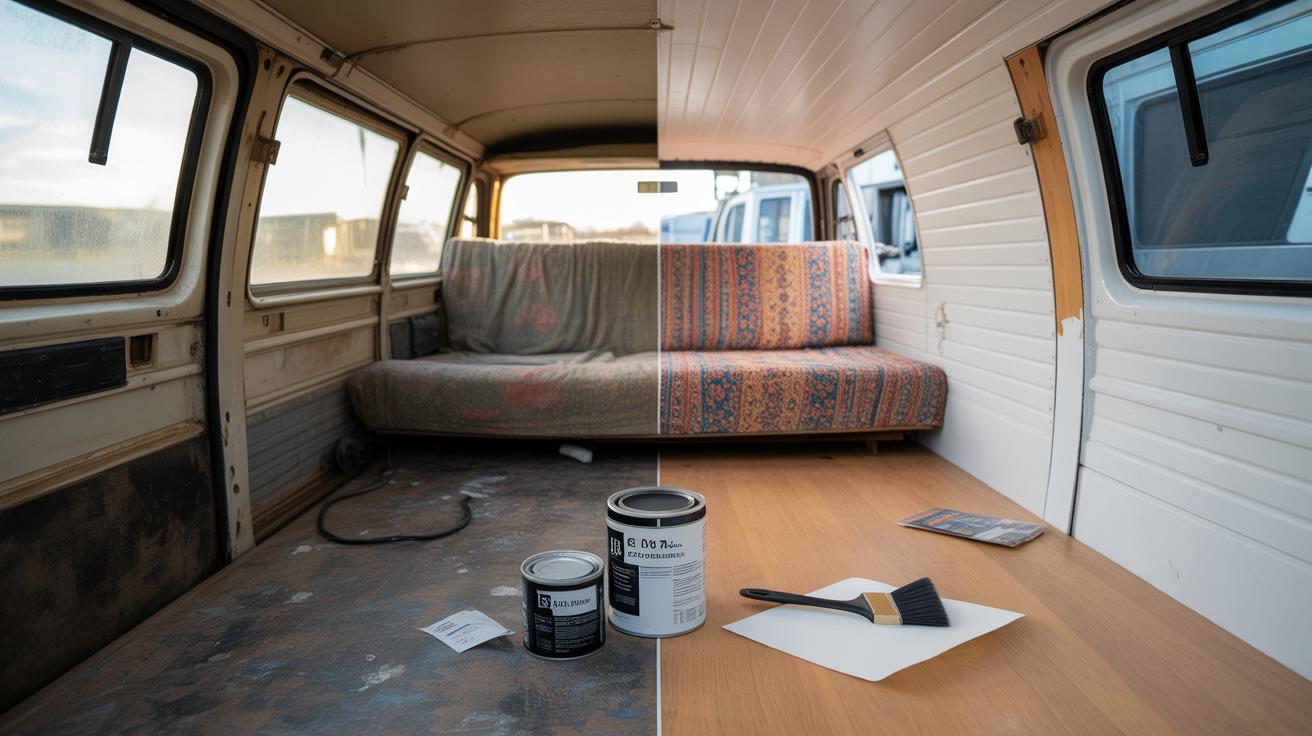
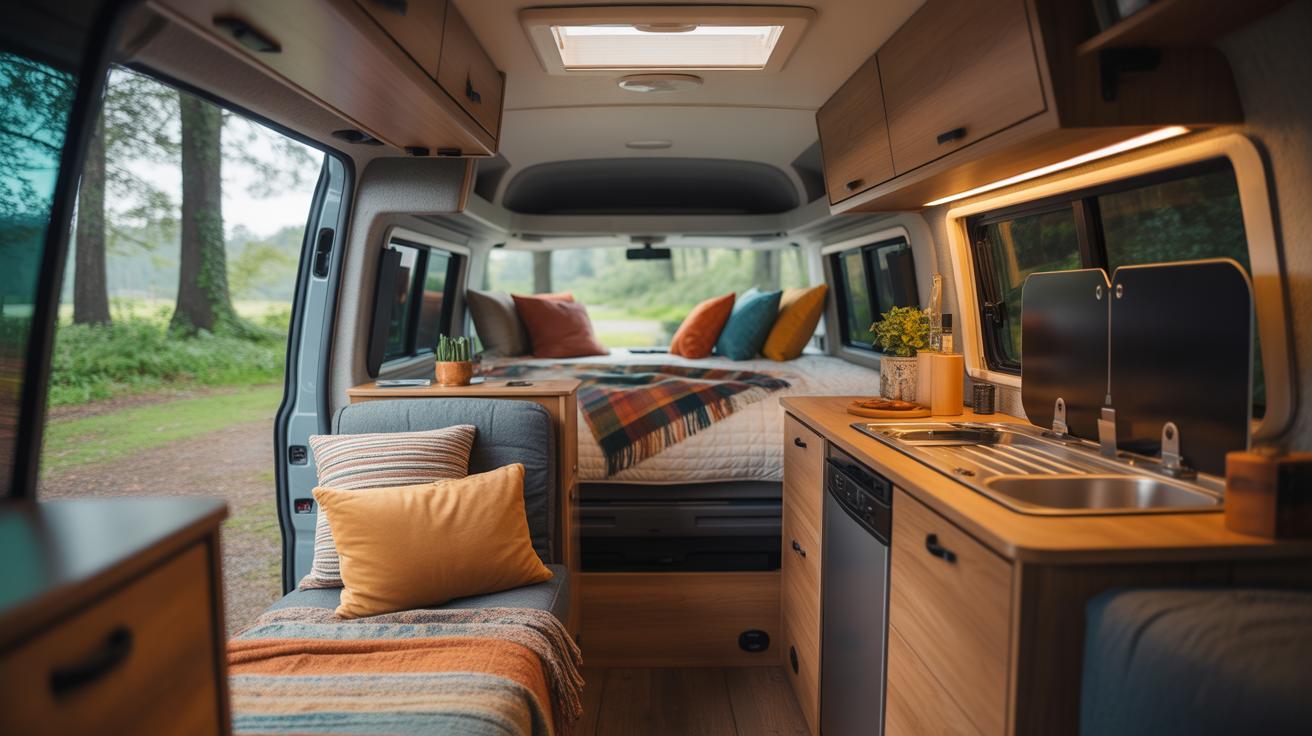
Decorating And Personalizing Your Space
Making a bus feel like home goes beyond just the structure and furniture. It’s about layering your personality onto those surfaces and spaces. Colors and lighting don’t just brighten rooms—they shape your mood. Choosing lighter shades can open up tiny corners, making them feel larger, while deeper tones often create a snug, cocoon-like effect. Often, you might start with one idea of color but then find yourself shifting your palette as you live there—there’s no right or wrong, really.
Soft, warm lights make evenings more inviting, whereas bright daylight bulbs help with focus during the day. Maybe string lights or small lamps catch your eye—not always practical, but they add character and comfort.
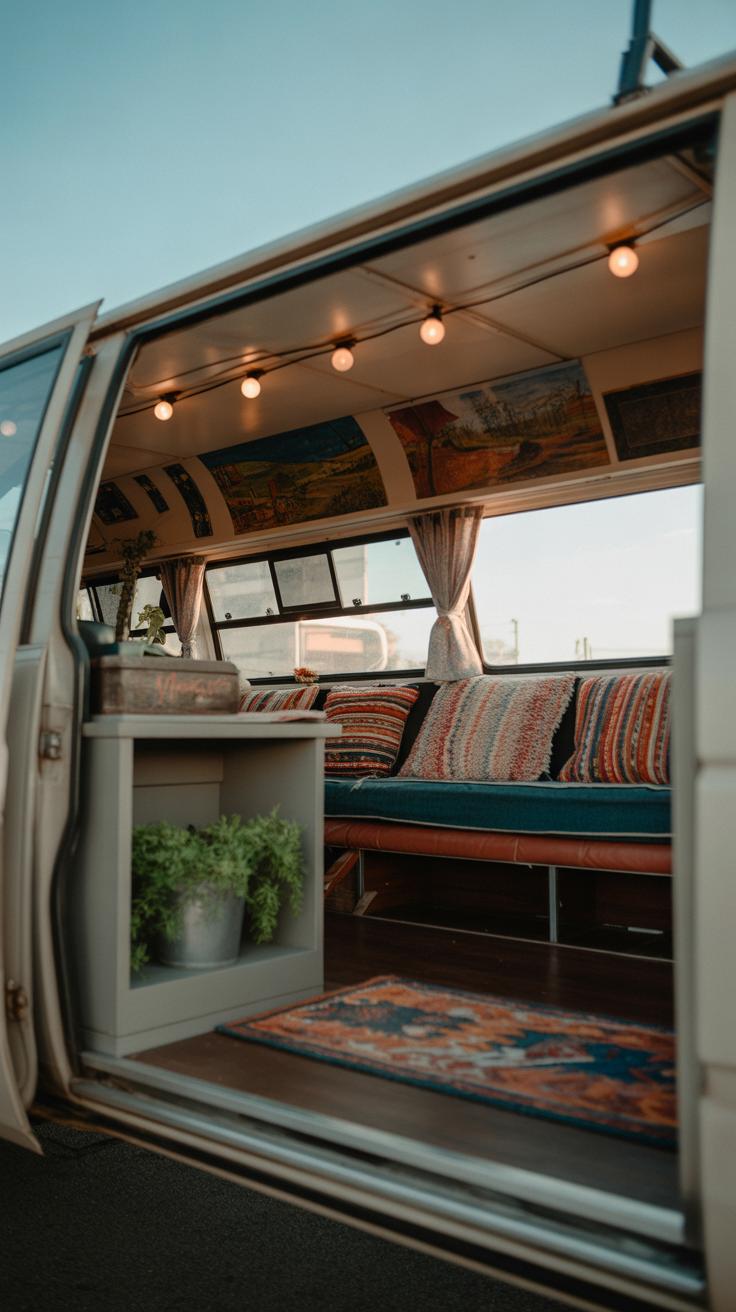
- Throw pillows and blankets in textures you love bring instant coziness that’s easy to switch out.
- Photos, postcards, or small art pieces personalize walls, breaking up plain areas without crowding space.
- Rugs can anchor zones within the bus, differentiating living from sleeping areas subtly but effectively.
- Plants are tricky but rewarding—if you have a spot where they thrive, they soften the sometimes stark feel of metal and wood.
It’s okay if your decor evolves or feels a bit mismatched at times—this isn’t a showroom. What matters is that each piece carries meaning or simply makes you smile when you see it. Do you prefer a cluttered, lived-in vibe or a clean minimalism? That preference can shift over time, so giving yourself permission to change things is part of the process too.
Living On The Road
Living in a converted school bus means adapting to a smaller, mobile home, which can be both freeing and tricky. Traveling takes on a different pace—you won’t just hop in and go for an afternoon drive like before. Planning your routes around bus-friendly roads, understanding your vehicle’s height and length, and factoring in fuel stops quickly become second nature. Even parking feels like a puzzle, sometimes a frustrating one.
Finding Places To Park
Finding a safe spot to park your bus requires some research and a bit of creativity. Not every parking lot wants a big, long vehicle, and residential areas don’t always allow overnight parking. Look for:
- Rest stops with designated areas for large vehicles.
- Campgrounds and RV parks, though they can fill up fast or have limits on bus lengths.
- Some Walmart or large retail parking lots, but always check local rules first.
- Street parking in areas that permit overnight stays, but you may need a permit.
Sometimes, finding the right spot means calling ahead or relying on apps designed for RV and bus travelers. I learned the hard way that assuming you can park anywhere often leads to scrambling at sunset.
Daily Life Tips
Daily routines shift dramatically once you live in a bus. Simple things like showering, cooking, or using the bathroom need planning ahead. Water conservation suddenly feels less like a suggestion and more like a rule.
Here are a few things that helped me:
- Establish a regular time for things like laundry and refilling water tanks. Busy weekends can throw off your rhythm.
- Keep essential supplies handy but don’t overcrowd the space. Clutter sneaks in easily in small rooms.
- Use public facilities when possible to save water and electricity, but have backups if you can’t.
- Stay flexible. Sometimes plans change because of weather, parking availability, or just plain fatigue.
Living this way means embracing uncertainty. Some days feel chaotic, others peaceful. Are you prepared for the unpredictability? Sometimes you have a perfect spot with wifi and calm neighbors; other times, it’s noisy or crowded. It’s all part of bus life.
Maintaining Your Bus Home

Mechanical Maintenance
Tending to your bus’s engine and mechanical parts isn’t just a one-time thing. It’s a regular cycle that keeps your home on wheels functioning—and safe. Simple tasks like checking oil levels, tire pressure, and brake pads can prevent bigger issues down the road. You might want to set reminders for fluid changes—engine oil, transmission, coolant—and watch for any leaks or odd sounds. Sometimes those squeaks or thumps mean something you haven’t noticed otherwise.
Keep an eye on the battery too. A dead battery can quickly turn your cozy home into a stationary one, wherever you’ve parked. The bus’s size and weight put extra strain on brakes and tires compared to a regular vehicle, so they need a bit more attention. Maybe try to build a small checklist for weekly or monthly checks—you’ll thank yourself the day the bus starts smoothly on a chilly morning.
Cleaning And Repairs
Living in a small space means dirt and wear are visible quickly. Sweeping and wiping down surfaces can’t be skipped for long without things feeling cramped and uninviting. Often, moisture and dust sneak into corners, so try to keep ventilation good to avoid mold or mildew, especially if you’re in humid places. I find it helps to clean a little every day rather than waiting for a major chore.
Small repairs become a part of the routine—loose screws on cabinets, minor leaks, or cracks in walls. Fixing these early stops them from worsening. You don’t need fancy tools—just a basic toolkit for tightening, patching, or lubricating parts inside. Do you check your fixtures regularly? It’s funny how a wobbly shelf can suddenly annoy you more than you’d expect. Over time, you’ll get a feel for what needs attention before it calls for emergency fixes. The key is to stay ahead, but without stressing too much about every little thing.
Conclusions
Living in a converted school bus offers you flexibility and the chance to enjoy life on your terms. By carefully planning and using smart design ideas, you can create a home that is both practical and welcoming. The process requires effort but results in a unique space that fits your needs.
Every step, from choosing materials to setting up utilities, influences how your bus home will feel. With creativity and hard work, you can enjoy a cozy living space wherever you go. Consider your lifestyle and needs carefully as you build your bus living space to make the most of this exciting opportunity.